
| ||||||
 Previous Daily Cosplay:


|
 Kingdom Hearts Photographer: kmrsworld734 See more images of Aqua 
I was working on this costume starting last fall, and I got it done literally the night before I premiered it at Naka-kon in February. Our Skit from Naka-kon. So here comes the wall of text about the costume construction: Wig: I had a super hard time finding a blue wig in the color I wanted, which was a blue-grey. I found some on ebay, but I didn't trust they'd have enough volume for the kind of spiking I wanted to do. In the end, I got a really long wig, cut off what I didn't need, and made wefts out of the hair I cut off. I used a meshy ribbon in the same color as the wig to sew the hair to, and then I sewed those wefts into the back of my wig. I styled the spikes with a light amount of Got2Be hair spray with a tiny bit of fabric glue in the tips of the spikes to help hold them together. To help keep the hair in the back down, I have bobby pins that I painted to match the color of the wig. Sleeves: Aqua's sleeves are kinda weird because they angle up so the highest part is where the armor is attached. I had to do something that would sturdy the material so the armor wouldn't tug it down. I ended up just making some arm bands out of craft foam sheets, and I sewed them into the tops of the sleeves like how you would do with interfacing. They're snug enough on my arms that they stay up really well, even if my arms are moving around a lot :3 They are made out of a white matte satin and lined with a second layer of the same satin on the inside. Gloves: Fingerless gloves are a lot harder to make than normal gloves because you have to finish the edges where you cut the fabric. I sewed these gloves completely by hand since they were difficult to do by machine (both because of how delicate some of the areas were, and because the fabric was mean and stretchy). I was also using a slip-stitch to sew all the bias tape to it (single-fold bias tape), and there was no way I'd be able to do that kind of detail by machine. These gloves are pretty difficult to get on and off though, since the bias tape does not stretch like the fabric does. Top: I started with a turtle-neck pattern, but ended up having to scrap it and just do some draping on myself (I used a navy blue ponte knit). I sewed in some darts, made a new collar, etc. I got some of those swimsuit/bra pads to sew on the inside, and the weird black boob things on the outside hide the stitching and darts (I made them out of the same black vinyl I used for my corset). I laid out the top and drew out the shapes I needed the vinyl edges to be. It's hard to describe the entire process without showing my visuals. Corset: I ended up making this twice because the first time I tried drafting it from scratch and failed. I later found a pattern and made some modifications. Instead of interfacing I just had some thicker fabrics (vinyl on the outside, and twill for the inside), but I did have to use plastic boning to keep its shape (it was my first time working with boning)! I modified the pattern itself so that it had just one piece in the front-middle, and the back has a split where I tie it up. I use some strips of the twill down each side under where the lacing should be (to match the references I had since it's a little darker), put in white eyelets, and used a ribbon for lacing (scotch tape wraps around the ends). I originally was just going to leave it as it was, but I liked how the references had strips running up each side of the lacing, so I ended up doing that out of vinyl (which covered up the eyelets). I have black eyelets with a black ribbon in the back of the corset so it's not as noticeable. Sash-wraps: I made these twice also, because the first attempt was with a fabric that was way too thick for the effect I wanted (it bunched up really funny where it ties at the sides). I ended up using a jet-set knit for my second attempt, and it worked perfectly. I cut out 4 really long strips (I think they were about 3 yards each?), folded them over, sewed them together, turned them right-side-out, and did a top-stitch along the seams. Some of the ends were finished at an angle, and the ones that end in the back have a ruffled piece attached. Two of the sashes are sewn at an angle inside the front of the corset. Those two loop to the back and tie at a knot (they're the ones with the ruffly ends). In the back of the corset I have sewn in two elastic loops, one on each side of the back opening. the sashes go through the loop on its respective side before tying together in the middle. Another sash drapes across my front, and the last one drapes across the back, and they tie onto the loops on the sides created from the first set of sashes (these are the ones that form the bow on each side). Again, something that is a bit hard to explain without showing visuals ^^; Shorts and socks: I started with some black ponte knit fabric and a leggings pattern (I think it was Simplicity?), bringing in the seams until they were conformed to my legs. I drew where I wanted the shorts to end (giving myself enough allowance for a hem) and cut off the leg pieces. I then used those tubes from the legs as my "socks." An issue I had though was that the socks kept wanting to fall down when I bent my legs, so I put elastic on the insides and outsides of my thighs to hold them up to the shorts like a garter. They have straps that go under my feet as well to keep them from sliding up. Skirt: Didn't use any pattern for this. I first draped some fabric on myself for the top portion. There is a seam in the back and an opening with a zipper in the front, but they are well-hidden by the sashes. I took 4 rectangles (2 for each side) and sewed them on the longer sides, turned them right-side-out, and top-stitched over the seams. At the tops I pleated the fabric and tucked it in-between the layers of the skirt's top-section before doing a top-stitch to attach them. I did the same sort of thing for the bottom ruffly section, but I did a gather instead of pleats. Was a very annoying process, but well-worth it. Since Aqua's skirt seems to have variations of colors where it folds, I chose to use a cornflower blue crepe-back satin. It gets the same effect as hers when the lighting is right, and it's very flow-y and soft. It reminded me of water when I first saw it, which is Aqua's namesake :3 Chest-straps: I ended up having to make these 3 times >___<. Between vinyl and normal fabrics, I loved the vinyl a lot more. Problem though was that vinyl in the right color was very hard to find. I was lucky to find pink at a local store, but it's not the exact same as the main reference I was going by. It does match the pink from some of her high quality CG renders though, so I personally think it works out fine. The straps cross across my back and snap together in the front. There is a velcro square at the very center that the emblem attaches to. Emblem: Made out of craft foam using several pieces to get the right geometry. Sealed the foam with layers of watered down glue and then painted over it with metallic paint. It's velcroed to the pink straps. Arm Armor: Another Aqua cosplayer made a wonderful pattern, and I made a few modifications. Essentially I used the craft foam armor technique but I painted with metallic paints instead of rub-n-buff (I've used that stuff before, but it's a bit messier and sometimes likes to rub/scratch off). I heated craft foam over the stove for the curves and glued fabric to the back to help keep their shapes. They were sealed with the water-glue-fabricglue-mixture before I painted them. The modifications I made to the aqua armor pattern were adding three darts into the top round piece, made the opening a bit bigger and added in a flat circle of foam, and cut another opening in that circle for a piece glued underneath. I also added some strips along the bottom edges of the funky-shaped pieces for extra geometry (I'll upload some better pictures of the armor itself later so you can see it). All the armor pieces are attached with pieces of elastic, and the top blue armor piece on each side is attached to my sleeves with velcro. Boot armor: found a black pair of boots at Goodwill, and created a pattern out of paper before constructing them out of craft foam. Sealed them and painted them the same way as the arm armor. The bottom parts are hot-glued to the shoes themselves, and the top parts have an opening in the back where they velcro together after I put the shoes on. Wayfinder: I originally was going to make them out of clear resin so they would have the stained-glass look, but I was running out of time before the con. I ended up making some quick ones for our group out of layers of craft foam (sounds cheap, I know, but they came out really awesome). Sealed them like I did for my armor pieces and then painted them. Used a brown ribbon for the string. Whew, that was long! I'm really proud of this costume, and it's taken me a lot longer than most others that I've made. Description including many more links can be read here. Cosplayer: Malindachan  Photographer: JeanneBeck  Photographer: kmrsworld734 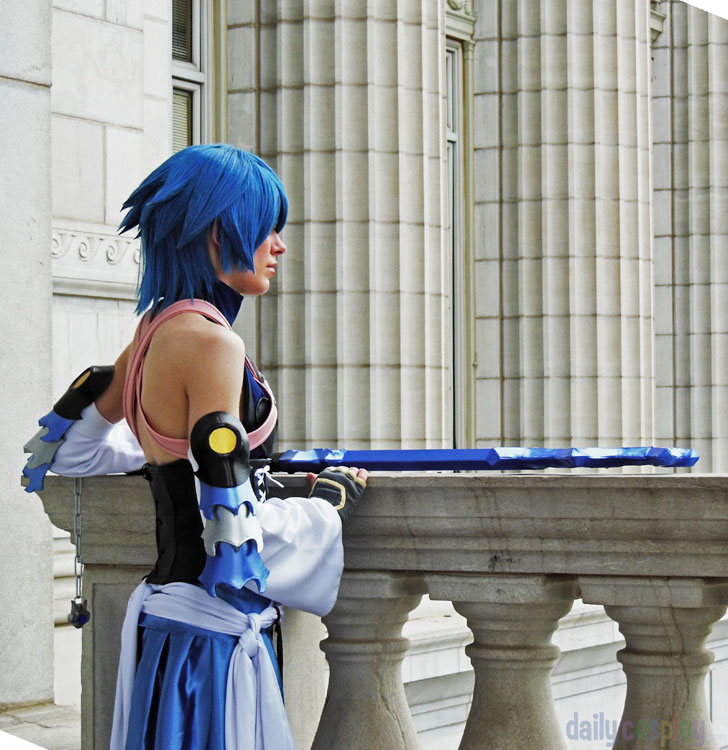 Photographer: JeanneBeck 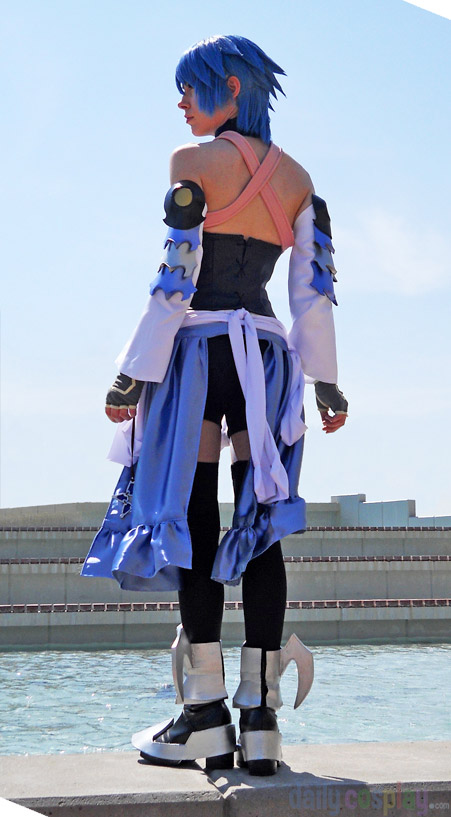 Photographer: kmrsworld734 Follow us on Twitter @DailyCosplay or Facebook for the latest news. To be featured on Daily Cosplay just fill out the entry form and provide two or more photos. Remember, the sooner you enter the better the chance your costume will be selected. If you have a video please include a link if you'd like to include it in your entry. We will review every submission. | |||||
|
Have a comment or question email us: | ||||||